Embedding Journeys
Embed any epilot journey on your website using a script tag. The embed script loads the journey by its ID and renders it in an iframe on your page.
This guide covers all available embedding options and the __epilot JavaScript API for advanced customization.
Legacy embed flow
This page documents the original __epilot iframe script. All new integrations should use the Journey Embed SDK, which rewrites the iframe engine and adds support for the <epilot-journey> Web Component behind a single API.
Existing embeds continue to work. For new projects, start with the SDK.
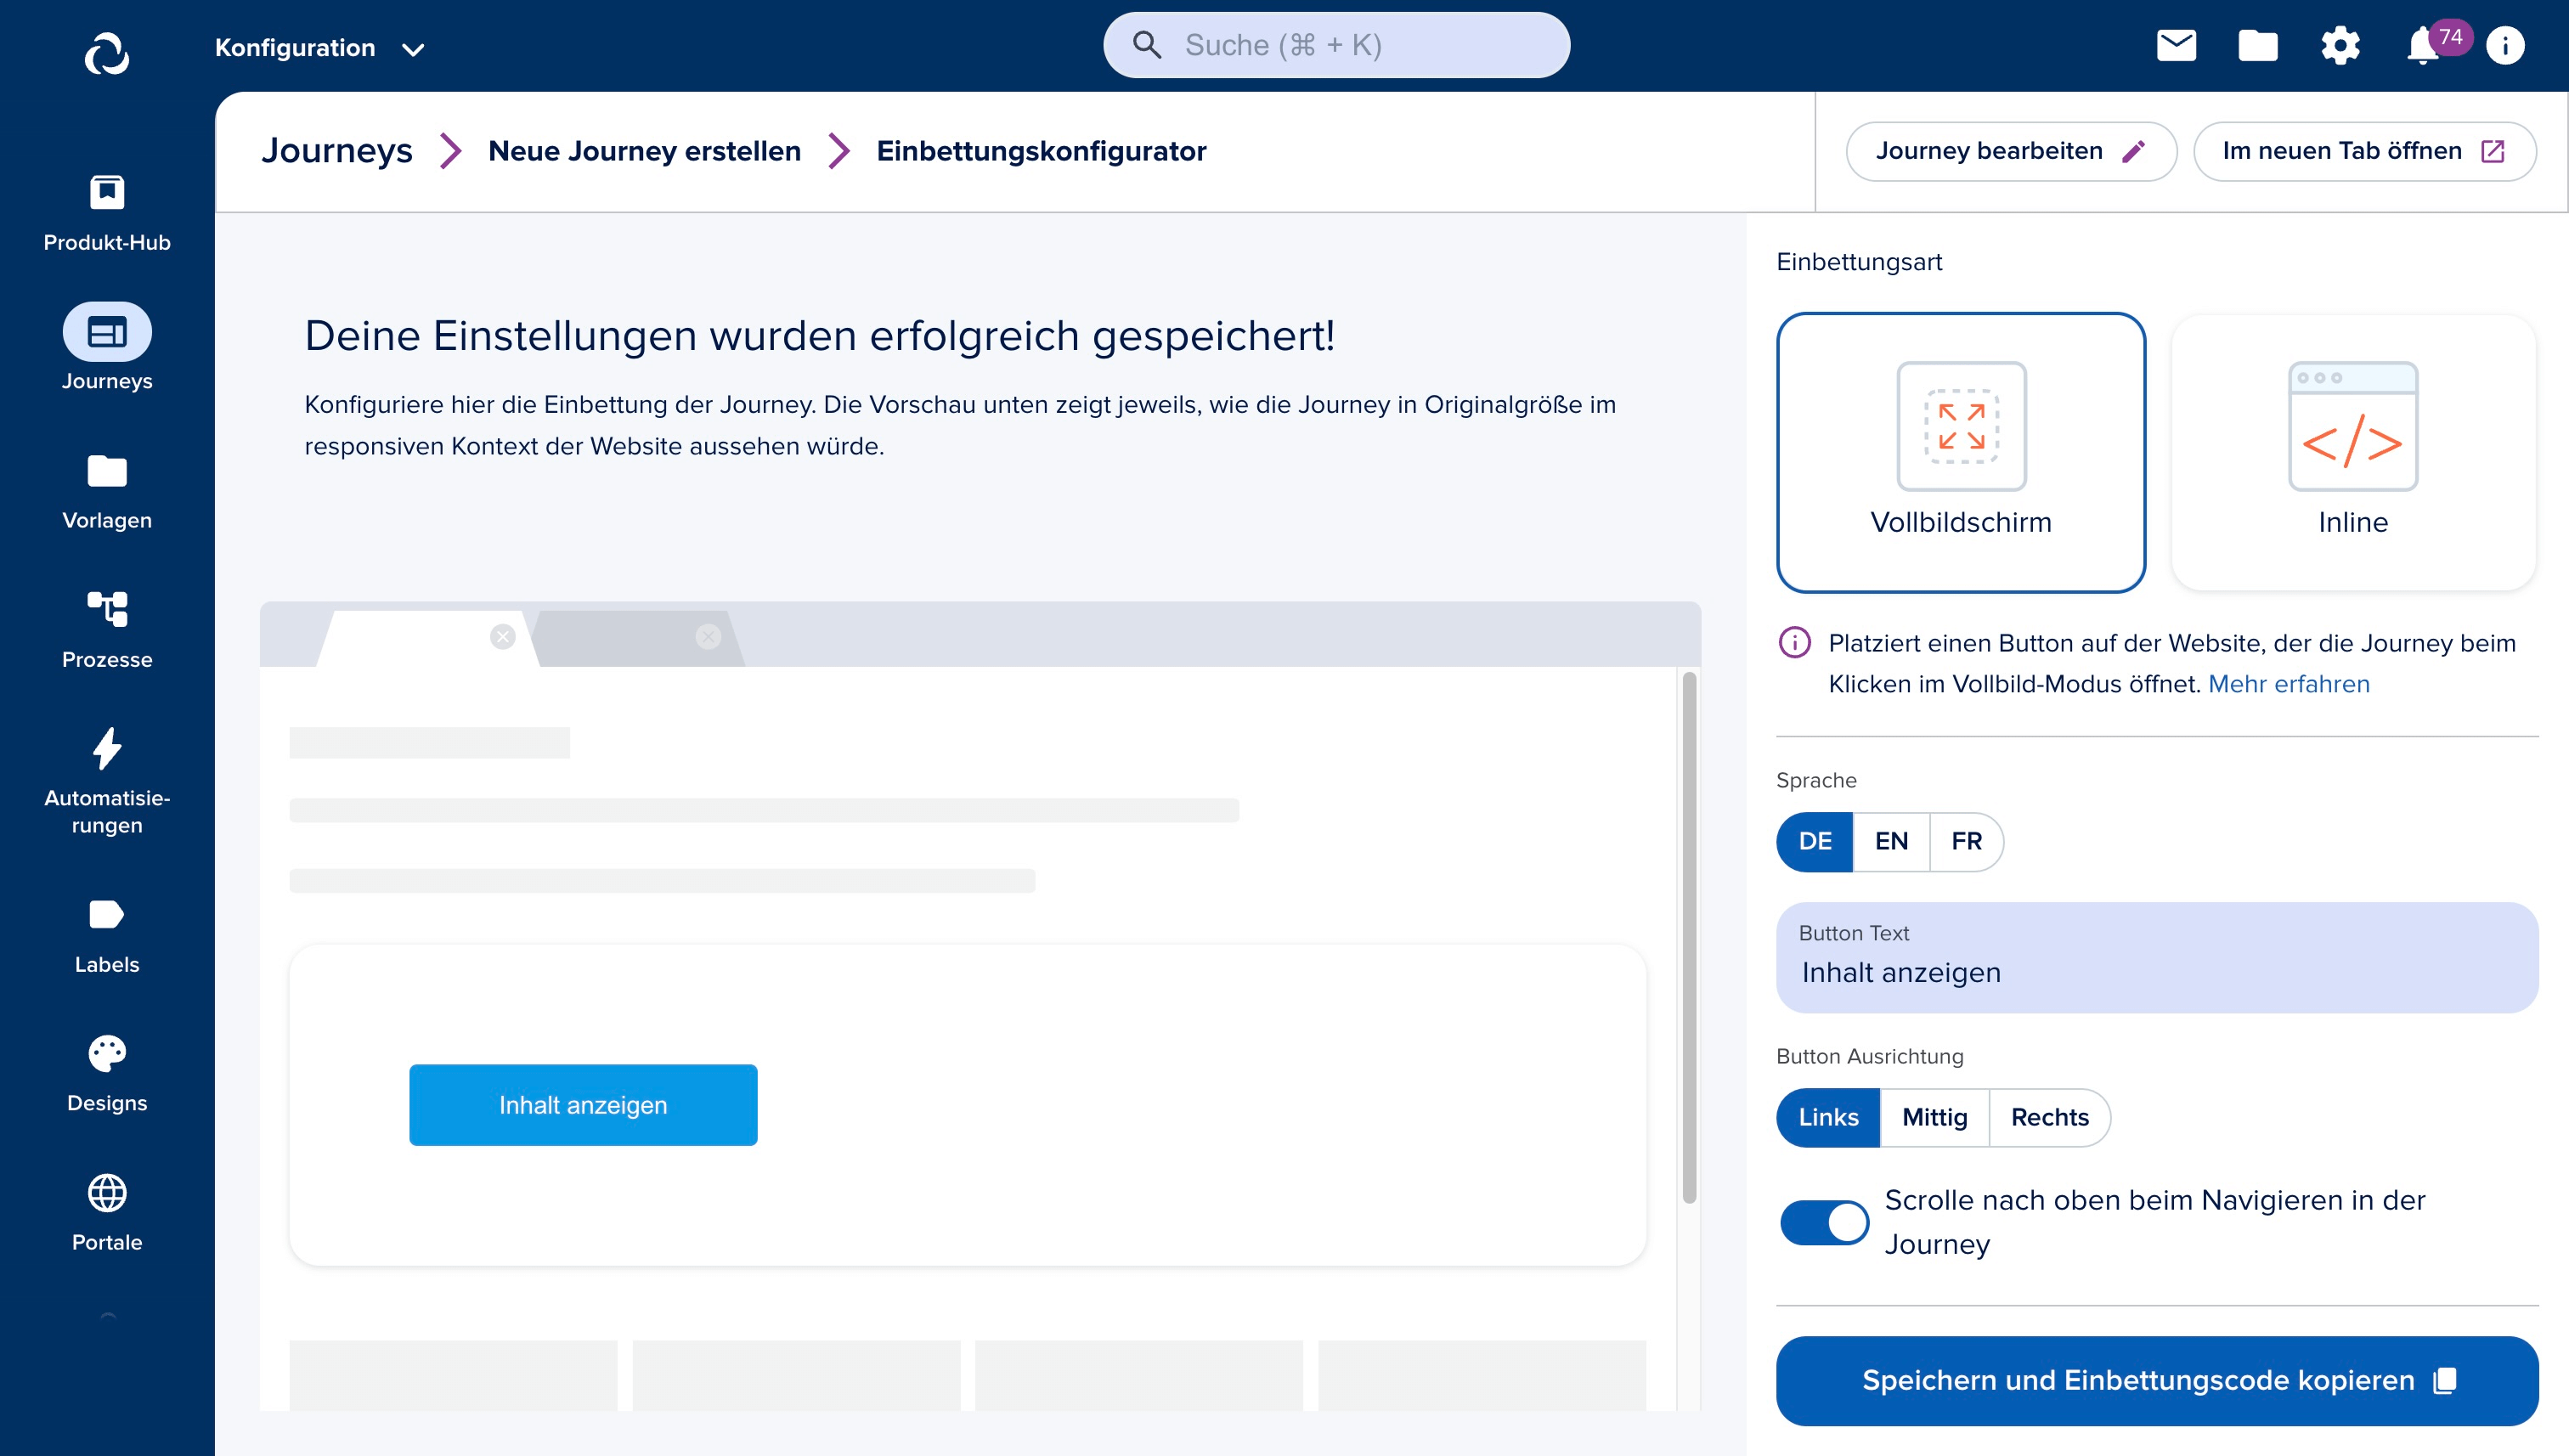
Embed Configurator
Configure and copy the embed script via the Journey Builder's Embed Configurator after saving your journey. Options include:
- Display mode — full-screen overlay or inline on your website (Default: Fullscreen)
- Language (Default: German DE)
- Button label — the text on the button that opens the journey (Default: Inhalt anzeigen)
- Button alignment — left, right, or center (Default: Left)
- Scroll to top — scrolls to the top of the journey when the user navigates to a new step (Default: ON)
Additional settings are available depending on the embedding type.
Journey Data Injection
The embed script can modify the initial state of a journey. You can:
- Prefill data — set initial values for journey blocks.
- Start from a specific step — skip earlier steps (e.g., when product selection happens on an external website).
- Control field display — disable specific fields.
The DataInjectionOptions type below defines all available options. See the Embed Script examples for working code.
Type Definition
export type DataInjectionOptions = {
  /** the stable id of the step to start the journey from. aka, where to start the journey from (recommended) */
  initialStepId?: string
  /**
   * the initial step index of the journey.
   * @deprecated legacy alternative to initialStepId; the 0-based index shifts when steps are reordered
   */
  initialStepIndex?: number
  /**
   * the initial state of the journey. aka, what data to prefill the journey with.
   * Read section below to understand how to populate this. Two forms are supported:
   * - recommended: an object keyed by the block's stable, journey-wide id -> block value
   * - deprecated (legacy): an array indexed by step position, each entry keyed by block name
   * */
  initialState?:
    | Record<string, Record<string, unknown>>
    | Record<string, unknown>[]
  /**
   * the display options to be passed to the journey — used to render blocks (or
   * specific fields) read-only. read-only is currently supported only for these
   * block types: Personal Information, Address, Availability Check, and Text Input.
   */
  blocksDisplaySettings?: BlockDisplaySetting[]
}

export type BlockDisplaySetting = {
  type: 'DISABLED'
  /** the stable, journey-wide id of the block to target (recommended) */
  blockId?: string
  /** @deprecated legacy alternative to blockId; the block name breaks silently when the block is renamed */
  blockName?: string
  /** @deprecated legacy alternative to blockId; the 0-based step index shifts when steps are reordered */
  stepIndex?: number
  blockFields?: string[]
}
The recommended form keys initialState by block ID — the block's stable, journey-wide identifier. Block IDs are unique across the whole journey and are unaffected by block renames or by reordering steps, so an embed keyed by block ID keeps working even after the journey is restructured. To find a block's ID, open the block configurator in the Journey builder.
A complete example combines all three: start the journey at a step by its stable initialStepId, prefill initialState keyed by block ID, and disable a block by blockId. Pass dataInjectionOptions alongside the rest of the options in __epilot.init():
__epilot.init([
  {
    journeyId: '123',
    mode: 'full-screen',
    dataInjectionOptions: {
      initialStepId: 'f0e1d2c3-b4a5-6789-0abc-def012345678',
      initialState: {
        'b1f2c3d4-5e6f-7a8b-9c0d-1e2f3a4b5c6d': { city: 'Berlin' },
      },
      blocksDisplaySettings: [
        {
          type: 'DISABLED',
          blockId: 'b1f2c3d4-5e6f-7a8b-9c0d-1e2f3a4b5c6d',
          blockFields: ['city'],
        },
      ],
    },
  },
])
With the block-ID form you only list the blocks you actually want to prefill — there is no need to pad earlier steps with empty objects, and the mapping is unaffected by block renames or step reordering. To find a block's ID, open the block configurator in the Journey builder.
Making blocks read-only
blocksDisplaySettings renders a block — or specific fields within it — as read-only: the prefilled values are shown but the end customer can't edit them. Each entry sets type: 'DISABLED' and targets a block by its stable blockId (recommended); add blockFields to lock only certain fields instead of the whole block.
Read-only is currently supported only for these block types:
- Personal Information
- Address
- Availability Check
- Text Input
Other block types don't support read-only.
Data Injection builder (preview)
You don't have to hand-write block IDs. The Journey Builder includes a Data Injection (preview) tool that lets you build the configuration visually: pick the blocks and fields to prefill, set their pre-fill values, mark blocks as read-only, choose the starting step, then copy the generated snippet straight into your __epilot.init() call.

Legacy step-index form (deprecated)
The earlier array form of initialState (one entry per step indexed by step position, keyed by block name, with empty {} objects for steps you don't prefill) and the blockName + stepIndex form of blocksDisplaySettings are deprecated but still supported for backward compatibility. They break silently when blocks are renamed or steps are reordered, so prefer the block-ID form for new integrations.
initialState: [
  {},
  {
    'Binary Input': false,
  },
  {
    'Personal Data Input': {
      salutation: 'Ms. / Mrs.',
      firstName: 'Test Name',
      _isValid: false,
    },
  },
]
Open your Journey in debug mode from the Journey Builder and inspect the state for each step. See below:
Configuration Possibilities
For more advanced configuration options, you can modify the embed script yourself, as it adds an interface to your website to interact with the journey: __epilot
Below are all available configuration options.
init
Description
Used to initialize one or more journeys given individual options. Multiple Journeys with different configurations can be passed
Type Definition
type Init = (options?: OptionsInit[] | undefined, initOnLoad?: boolean) => void
type JourneyMode = 'inline' | 'full-screen'

type OptionsInit = {
  /** id of the journey to initialise (load configuration) */
  journeyId: string
  /** url to override iframe src */
  journeyUrl?: string
  /** mode the journey runs in -> inline | full-screen */
  mode: JourneyMode
  /** the minimum height the journey runs in when in inline mode */
  minHeight?: string
  /**
   * whether to show or hide the topBar
   * @default true
   */
  topBar?: boolean
  /**
   * whether to scroll to the top after step navigation
   * @default true
   */
  scrollToTop?: boolean
  /**
   * whether to show the closeButton if in inline mode
   * @default true
   */
  closeButton?: boolean
  /** additional data passed to the journey + submission */
  contextData?: Record<string, unknown>
  /** the language the journey should be initialised in */
  lang?: string
  /** the data injext options that will be passed to the journey */
  dataInjectionOptions?: DataInjectionOptions
  /**
   * Used as iframe name/title attribute if provided
   */
  name?: string
}
Usage
__epilot.init([{ journeyId: '123', mode: 'full-screen', topBar: false }])
To prefill data, pass dataInjectionOptions keyed by block ID alongside the rest of the options. See Journey Data Injection for the full example and option reference.
update
Description
Used to update an initialized journey by passed options.
Type Definition
type Update = (journeyId: string, payload?: OptionsUpdate) => void
type OptionsUpdate = Omit<OptionsInit, 'journeyId'>
Usage
The update method updates a journey's embed configuration.
Note: This does not update the initial state set by dataInjectionOptions.
__epilot.update('123', { journeyId: '123', mode: 'full-screen', topBar: false })
on
Description
Sets up an event listener to execute custom logic based on journey events.
Uses cases:
- Execute logging, or tracking
- Adjust website CSS, e.g. if full screen exited
Type Definition
type JourneyEvent =
  | 'init'
  | 'enterFullScreen'
  | 'exitFullScreen'
  | 'closeJourney'

type On = (
  eventName: JourneyEvent,
  cb: (payload: Record<string, unknown>, event: CustomEvent) => void
) => void
Usage
__epilot.on('init', function ({ journeys }) {
  console.log('Journey Initialized')
})
enterFullScreen
Description
If a journey is initialized in full-screen mode, executes the command to open the journey.
Type Definition
type EnterFullScreen = (
  journeyId: string,
  payload?: Record<string, unknown> | undefined
) => void
Usage
__epilot.enterFullScreen('123')
exitFullScreen
Description
If a journey is in full-screen mode, executes the command to close the journey. It is also internally used at the Journeys “Close button”.
Type Definition
type ExitFullScreen = (
  journeyId: string,
  payload?: Record<string, unknown> | undefined
) => void
Usage
__epilot.exitFullScreen('123')
isInitialized
Description
Checks whether a journey is already initialized.
Type Definition
type IsInitialized = (journeyId: string) => boolean
Usage
if (__epilot.isInitialized('123') === true) {
  __epilot.enterFullScreen('123')
}
Scenarios
Full-Screen
The default embed method covers most of the use cases. A button will be placed on your website which opens the journey, covering the complete screen when clicked.
Code Snippet
The below code snippet provides the configured embed script and a button opening the journey when clicked. Don’t forget to change the placeholder ids to your own journey ids!
<!-- Clicking this button will open your Journey -->
<button onclick="__epilot.enterFullScreen('<your-journey-id>')">
  Open Journey
</button>

<!-- Embed script managing your Journey -->
<script
  data-ep-mode="full-screen"
  data-ep-journeyIds="<your-journey-id>"
  src="https://embed.journey.epilot.io/bundle.js"
></script>
Attributes explained
data-ep-mode — sets the mode the journey runs in
data-ep-journeyIds — the journey to load by its ID
Outcome

Inline
This method will place the journey into a provided container element, or, if not provided, at the end of the web page. The height of the journey will automatically be recalculated based on the current content. In order to provide a better user experience, navigating to a different step will cause the browser to move back to the top position of the journey. The close button of the top bar is hidden.
Code Snippet
The below code snippet provides the configured embed script required to set up the inline mode and a container where the journey is being placed in. Don’t forget to change the placeholder ids to your own journey ids!
<!-- Your Journey will go into this container -->
<div id="epilot-journey-<your-journey-id>"></div>

<!-- Embed script managing your Journey -->
<script
  data-ep-mode="inline"
  data-ep-journeyIds="<your-journey-id>"
  src="https://embed.journey.epilot.io/bundle.js"
></script>
Attributes explained
data-ep-mode - sets the mode the journey runs in
data-ep-journeyIds — the journey to load by its ID
Outcome
Multiple Journeys
The best way to embed multiple journeys is to use the __epilot interface described here. Simply pass multiple items to the init function
Code Snippet
<button onclick="__epilot.enterFullScreen('<your-journey-id-1>')">
  Open Journey
</button>
<button onclick="__epilot.enterFullScreen('<your-journey-id-2>')">
  Open Journey
</button>
<script src="https://embed.journey.epilot.io/bundle.js"></script>
<script>
  __epilot.init([
    { journeyId: '<your-journey-id-1>', mode: 'full-screen' },
    { journeyId: '<your-journey-id-2>', mode: 'full-screen' },
  ])
</script>
Attributes explained
In this example, no data-ep- attributes are needed because the __epilot.init() API handles configuration directly.
Outcome

Recommended: Journey Embed SDK
For new integrations, use the Journey Embed SDK. It replaces the legacy __epilot script documented on this page with a unified JavaScript API that covers both:
- A rewritten iframe engine — same embedding model, faster and cleaner than the legacy bundle.
- The
<epilot-journey>Web Component — renders directly in your page using Shadow DOM for better performance, accessibility, and tighter host integration.
See the SDK documentation for setup, the full API reference, and a migration guide from __epilot.init().
Changelog
2026-06-11
- Data injection now documents stable block IDs as the recommended form:
initialStatekeyed by block ID,initialStepIdfor the starting step, andblocksDisplaySettingstargeting blocks byblockId. Block IDs are unique journey-wide and resilient to block renames and step reordering. The legacy step-index + block-name forms remain supported but are deprecated.